Feeds:
Posts
Comments

If you encounter an error “Error 1934 . User installations are disabled via policy on the machine” while upgrading from vcenter 6.0 update 2 to update3 and the installer fails . Follow the steps below to fix the issue

1.Open registry editor (Start > Run > regedit)

2. Go to HKEY_LOCAL_MACHINE\SOFTWARE\Policies\Microsoft\Windows\Installer

3. Change the DisableUserInstalls value to 0

4. Re-run the vcenter server installer again

  1. Download the below 2 listed files required for upgrade from VMware downloads
    1. vRealize_Operations_Manager-VA-6.6.0.5707160.pak
    2. vRealize_Operations_Manager-VA-OS-6.6.0.5707160.pak
  2. Go to the URL https://<fqdn or IP of the appliance>/admin/login.action
  3. Login using the user : admin and the password that was setup initially while deploying the appliance
  4. Go to Software Update under Administration and click on Install Software Update1
  5. Select Browse and select the file  vRealize_Operations_Manager-VA-6.6.0.5707160.pak downloaded locally and click Upload2
  6. Verify the information of the file and the version once the upload is complete and then click Next
  7. Accept the end user license agreement and click Next8
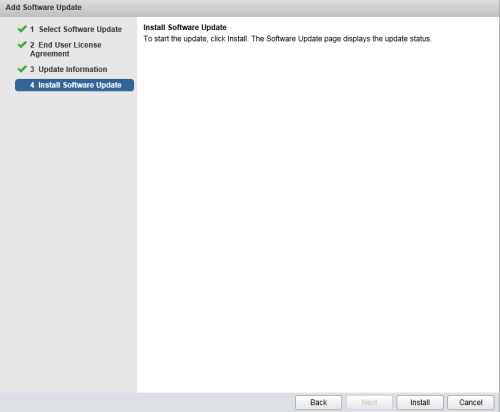
  8. Click Install to begin installation 7
  9. Verify the steps completed column and click on the notepad icon to see the progress in a txt format 6
  10. Wait until the Steps Completed column says 9 of 9 and the status column says completed 3
  11. Take the cluster offline after the installation is complete by clicking on Take offline button9
  12. Follow the same steps to upload and install vRealize_Operations_Manager-VA-OS-6.6.0.5707160.pak which is the OS pak for vROPS
  13. This installation would take approx 20-25 min depending on the no.of nodes in the cluster

Steps performed :

  1. Restarted vcenter server multiple times
  2. Restarted webclient and all dependency services
  3. Looked into vpx log


2017-05-09T14:05:27.785-05:00 warning vpxd[14268] [Originator@6876 sub=Default] Failed to connect socket; <io_obj p:0x0000000009e2ce88, h:3564, <TCP ‘0.0.0.0:0’>, <TCP ‘[::1]:8088’>>, e: system:10061(No connection could be made because the target machine actively refused it)
2017-05-09T14:05:28.785-05:00 warning vpxd[14268] [Originator@6876 sub=Default] Failed to connect socket; <io_obj p:0x000000000c53f678, h:3564, <TCP ‘0.0.0.0:0’>, <TCP ‘127.0.0.1:8088’>>, e: system:10061(No connection could be made because the target machine actively refused it)
2017-05-09T14:05:28.785-05:00 error vpxd[14268] [Originator@6876 sub=HttpConnectionPool-000001] [ConnectComplete] Connect failed to <cs p:0000000009a45d20, TCP:localhost:8088>; cnx: (null), error: class Vmacore::SystemException(No connection could be made because the target machine actively refused it)
2017-05-09T14:05:28.785-05:00 error vpxd[02716] [Originator@6876 sub=httpUtil] [HttpUtil::ExecuteRequest] Error in sending request – No connection could be made because the target machine actively refused it
2017-05-09T14:05:28.786-05:00 error vpxd[02716] [Originator@6876 sub=Health] [VpxdHealth::HttpRequestHealthStatus] Unable to get health from url http://localhost:8088/workflowhealth. Error is vim.fault.HttpFault
2017-05-09T14:05:28.786-05:00 error vpxd[02716] [Originator@6876 sub=WorkflowHealth] [Vpxd::Workflow::Health::Poll] Error fetching health of workflow manager at url http://localhost:8088/workflowhealth.HTTP ResponseCode Info: code = -1, message = Unknown
2017-05-09T14:05:28.787-05:00 warning vpxd[02716] [Originator@6876 sub=VpxProfiler] InvokeWithOpId [TotalTime] took 2003 ms

Steps which helped :

  1. Made sure vcenter server had enough space for the services to start up
  2. Started vcenter workflow manager service and then restarted vcenter inventory service, vcenter server and vcenter webclient

I was able to get into the web client after this


If you are using HCI bench to perform a load simulation on VSAN and If you encounter an error when clicking on “validate” option in HCI bench . Please make sure HCI bench can access vcenter server and all the Hosts on port 443 and ICMP .

HCI.png

HCI1.png


VSAN recommends disabling SSD smart path on the logical drives of any smart arrays for better performance. In my case i have an HP DL560 Gen9 and HP provides a utility called HPE SSA (Smart Storage Administrator) and there are 3 ways to invoke this utility HPE SSA GUI, the HPE SSA CLI, and HPE SSA Scripting. We use SSA GUI to disable the feature

  1. Reboot the server and press F10 to access intelligent Provisioning
  2. Select Perform Maintenance in the main screen
  3. Under Maintenance select HPE Smart Storage Administrator (SSA)
  4. Once the GUI is launched select configure from the home screen
  5. Select a controller from the Devices menu and the Actions panel appears
  6. Under Configure>Logical Devices, choose the array with logical drives and click Disable HPE SSD Smart PathHPE SSD.png

By default the vcenter server standalone converter combines both the drives from the source physical server as 1 vmdk . So in my case it combined both C and D drive to 1 vmdk . Follow the below listed steps to have separate drives while performing a P2V

  • While going thorugh the conversion wizard on Options page, click Edit in the “Data to copy” section
  • Click Advanced
  • Click Destination Layout . This screen will allow you to change from thin to thick or thick to thin provisioned disks.
  • Click “Add disk” and use the option “Move up” to move the newly added disk to be placed above D drive in the disk layout
  • Finish the installer and the virtual server should now have 2 seperate vmdks (1 for C and 1 for D)


VMware vcenter standalone converter fails at 56% throwing an error

FAILED: An error occurred during the conversion: BlockLevelVolumeCloneMgr::CloneVolume: Detected a write error during the cloning of volume \WindowsBitmapDriverVolumeId=[8D-0B-8D-0B-00-7E-00-00-00-00-00-00]. Error: 37409 (type: 1, code:2338)’

  1. Run chkdsk to make sure all the drives on the physical server have no errors.
  2. Go to services.msc and Stop all the application services that are running and keep only windows services running
  3. Attempt the P2V conversion again

Although enabling direct root access is not recommended but there might be a situation where you might need to enable it.Below steps would give permissions for root to SSH into VMA.

1. Login as vi-admin and the password given while deploying the OVF appliance
2. sudo vi /etc/passwd
3.root:x:0:0:root:/root:/bin/bash
4. vi /etc/ssh/sshd_config
5. PermitRootLogin yes
6. service sshd restart

The windows installer VMware-vSphere-Perl-SDK  fails with an error “Error 1719. Windows Installer service could not be accessed.  Contact your support personnel to verify that it is properly registered and enabled.”

  1. Start > Run
  2. %windir%\system32\msiexec.exe /unregister
    %windir%\syswow64\msiexec.exe /unregister
    %windir%\system32\msiexec.exe /regserver
    %windir%\syswow64\msiexec.exe /regserver
  3. Re-Run the installer again

If there is a situation or a need to change the username and password for a database (maybe because of password change compliance requirement) that’s being used by update manager . Here are the steps to follow

  1. Launch odbc32.exe from C:\Windows\SysWOW64 directory if you are using a 64-bit DSN
  2. Go to System DSN and select the data source configured for Update Manager and hit Configure 
  3. Make a note of the DB server that the datasource is configured with and hit Next
  4.  
  5. The next screen lists the username and password configured to authenticate the Update Manager DB
  6. Have the DBA change the password for the account first and then update the password in DSN
  7. Migrate to the installation directory of VUM either C:\ or D:\ (D:\Program Files (x86)\VMware\Infrastructure\Update Manager) and launch VMwareUpdateManagerUtility as Administrator
  8. Enter the IP address or FQDN of the vcenter server and use any administrative credentials that has permissions to authenticate vcenter server
  9. This screen can be used for multiple options such as changing the proxy settings, Database Settings, re-register update manager with vcenter server and for SSL certificates. This article only focuses on DB password changes
  10. Enter the username and the new password in the fields listed and hit apply.
  11. Restart the Update Manager service for changes to take effect